Datadog Cost Exports with nOps Platform
Video Tutorial
How the Integration Works
The nOps platform securely retrieves cost-related data from your Datadog account using Datadog API keys. This integration ensures accurate and timely insights into your cloud spending.
Data Flow and Processing
-
Data Retrieval
The nOps platform queries Datadog APIs to fetch cost data securely using your API and Application keys. -
Data Processing
The retrieved data is processed and displayed within the Inform product, providing actionable insights into your Datadog usage. -
Actionable Insights
Once processed, you can:- Monitor your Datadog usage and spending
- Optimize your resource allocation
- Identify cost-saving opportunities
Authentication Requirements
To enable the integration, nOps requires your Datadog API Key and Application Key. These keys must have the usage_read and billing_read permissions to securely retrieve cost and usage data. By granting this access, the nOps platform can seamlessly integrate with your Datadog account to provide in-depth explorer.
Creating Datadog Credentials
To integrate Datadog with Inform, follow these steps:
- Create API Key
- Create Application Key
Create API Key
-
Use
Ctrl + K(Windows/Linux) or⌘ + K(Mac) to open the Datadog search bar. -
Type
/organization-settings/api-keysand hit Enter to navigate directly to the API Keys page. -
Click the New Key button to create an API key.

-
Enter a name for your key, e.g., "API key for nOps."
-
Click Create API key.
-
Copy and Store the API Key (not the Key ID) somewhere safe for use in nOps.

Create Application Key
-
Use
Ctrl + K(Windows/Linux) or⌘ + K(Mac) to open the Datadog search bar. -
Type
/organization-settings/application-keysand hit Enter to navigate directly to the Application Keys page. -
Click the New Key button to create an Application key.

-
Enter a name for your key, e.g., "Application key for nOps."
-
Click Create Application key.
-
Copy and Store the Application Key (not the Key ID) somewhere safe for use in nOps.

-
Click Edit and enable the usage_read and billing_read scopes and click Save.

What to Do if You Don't Have Access to Enable usage_read and billing_read
If you do not have the necessary permissions to enable the usage_read and billing_read scopes for your Datadog Application Key, follow these steps to get assistance from someone in your organization who has the required access:
Step 1: Identify the Right Person
- Reach out to your Datadog Organization Administrator. This is typically someone who manages your organization's Datadog account and permissions.
- If you're unsure who this is, check with your IT Department or Team Lead.
Step 2: Request Scope Changes
Provide the following information when requesting the scope update:
- Purpose: Explain that the
usage_readandbilling_readscopes are required for integrating Datadog with the nOps platform to enable BC+ functionalities. - Key Details: Share the name of the Application Key that needs the scope update.
- Steps to Enable: Provide these steps to the administrator:
- Navigate to Organization Settings > Application Keys in the Datadog dashboard.
- Locate the Application Key in question.
- Click Edit, enable the
usage_readandbilling_readscopes, and click Save.
Step 3: Follow Up
Once the permissions are updated:
- Test the integration to ensure the changes are applied successfully.
- If you encounter any issues, share the error details with your administrator for further investigation.
Making Inform Integration
To configure the integration between Datadog and Inform, follow these steps:
1. Access the BC+ Integrations Page
Navigate to your nOps account's Organization Settings and select the BC+ Integrations tab.
Alternatively, you can directly access it using this link.

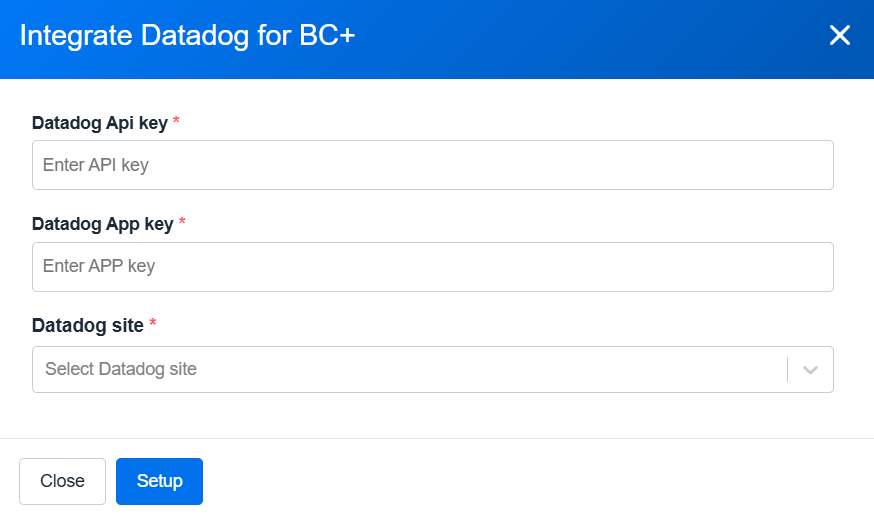
2. Configure the Datadog Integration
-
Enter your Datadog API Key in the provided field.
-
Enter your Datadog Application Key in the respective field.
-
Select your Datadog Site from the dropdown menu.
The dropdown menu includes all available Datadog site options, making it easy to match your Datadog dashboard.
noteYou can read more about the Datadog site here.
3. Save Your Configuration
After filling out all the fields, click Setup to complete the integration process.
